Introduction to Java

Install Apache Netbeans.

Open Netbeans and go to File > New project > Java with Maven > Java application.

Click Next and select a project name as well as a project location. You can also name the package.

Hello World

The very first program to start with: print “Hello World”. The file which is automatically created is called HelloWorld.java (it must have the same name with the class). Moreover the class name must start with un uppercase letter.

public class HelloWorld {
    public static void main(String[] args) {
        System.out.println("Hello World!");
    }
}

Everything in Java is associated with a class. Even the simpler program (in our case the “HelloWorld” program) must be inside a class. The class is “public” as it is out in the open for anyone to see. A public class is accessible from another program.

Inside the class we usually start with the main() method.

A method in Java is a function, i.e. a block of code that performs specific actions when called. The default choice for most Java programs is the public static void main() method.

Public means accessible from external classes. Static means that the main() method belongs to the class rather than to a specific instance. Void means that the method returns nothing. More of these aspects will be discussed later.

The arguments of the main() method could be empty. Usuallly we use String[] args, which is an array of Strings named args. The point is that the user may pass some arguments to the program. For more see here.

Inputs and Outputs

To get an input from the user (through the keyboard), the java.util.Scanner package must be imported to the program.

To output (print) a message or a variable in Java, use the System.out.print() or System.out.println() to print in separate lines.

import java.util.Scanner;
public class InputsOutputs {
    public static void main(String[] args) {
        Scanner scan = new Scanner(System.in);
        System.out.println("Enter a number");
        int num = scan.nextInt();
        System.out.println("The number is " + num);
    }
}

The variable scan is an object of the class Scanner which is used to “scan” inputs from the user.

The scan.nextInt() is a method that returns the input as integer.

There are also the following methods:

  • scan.nextDouble() returns the input as a double number (decimal)
  • scan.next() returns the input as a string
  • scan.nextLine() returns the whole line as a string
import java.util.Scanner;
public class InputsOutputs {
    public static void main(String[] args) {
        Scanner scan = new Scanner(System.in);
        System.out.println("Enter an integer");
        int i = scan.nextInt();
        System.out.println("The integer is " + i);
        System.out.println ("enter a double");
        double d = scan.nextDouble();
        System.out.println("The double is " + d);
        System.out.println ("enter a word");
        String w = scan.next();
        System.out.println("The word is " + w);
        System.out.println ("enter a phrase");
        String p = scan.nextLine();
        System.out.println("The phrase is " + p);
    }
}


Lua in Roblox

Coding in Roblox with Lua

1/ Create scripts

Create script by pressing the (+) sign next to Workspace or a Part.

Rename the script if you like (as you can run multiple scripts per object).

Write comments in script with —

2/ Objects

Dot notation

script.parent to refer to the parent of the script

For every object we have properties, built-in functions, and events.

3/ Change properties

game.Workspace.Part.BrickColor = BrickColor.new(“Really red”)

game.Workspace.Part.Transparency = 0 – – disappear with 0

game.Workspace.Part.Reflectance = 0.5

game.Workspace.Part.Material = “Brick”

game.Workspace.Part.Anchored = true

game.Workspace.Part.CanCollide = false

4/ Referencing a part

part = game.Workspace.myPart

and then:

part.Transparency = 1

5/ Variables

myVariable = “hello”

x = 5

done = true

print(myVariable)

6/ Create new part

part = Instance.new(“Part”) –from advanced objects see what parts are available

part.Parent = game.Workspace

Alternatively:

part = Instance.new(“Part”, game.Workspace)

7/ Positions

part.Position = Vector3.new(0, 0, 0)

8/ Loops & conditionals

— while loop

counter = 0
while counter < 10 do
    local part = Instance.new(“Part”, game.Workspace)
    wait(1)
    counter ++
end 

— for loop

for i = 1, 10, 1 do
    print (i)
end

general form:

for i = x, y, z do

x initial value

y final value

z step

9/ Functions

function myFunction()
 game.Workspace.Baseplate.BrickColor = BrickColor.new(“Really Red”)
end
wait(2)
myFunction()

Parameters

function addition (number1, number2)
    print(number1 + number2)
end
addition(5, 7)

10/ Events

An event listens for something to happen and when it does, it triggers an action. 

Set up an event (listener to events) – Connect it to a function.

View >> Object Browser. See events (lighting icons) per object. You can use any event available for the specific object.

For objects Part there is an event called “Touched”.

Create a Part. Call it “TouchedEventPart”.  

Create a script in Workspace. Inside the script we refer to the TouchedEventPart:

game.Workspace.TouchedEventPart.Touched:Connect(function()
game.Workspace.Baseplate.BrickColor = BrickColor.new("Black")
end)

Another example: Create a Part. Name it PartMurder. When touched it will print “Kill him!”

function killPlayer()
    print ("Kill him!")
end
game.Workspace.PartMurder.Touched:Connect(killPlayer)

Parameters: You can pass to the function a parameter. The type of the parameter is defined if you choose the event and see the input type. Eg for the touched event the parameter is the object which touched the part. 

game.Workspace.TouchedEventPart.Touched:Connect(function(hit)
print (hit.Name)
end)

The instance hit will receive the other part (body part i.e. RightFoot, LeftLeg etc).

game.Workspace.TouchedEventPart.Touched:Connect(function(hit)
    print (hit.Parent.Name)
end)

Print the name of the player.

game.Workspace.TouchedEventPart.Touched:Connect(function(hit)
hit.Parent.Humanoid.Sit = True
end)

Make the player sit. Humanoid is a property for players.

game.Workspace.TouchedEventPart.Touched:Connect(function(hit)
    if game.Players:GetPlayerFromCharacter(hit.Parent) then
        hit.Parent.Humanoid.Sit = True
    end
end)

11/ If statements

if 2+3 == 5 then
    print (“correct”)
end


if game.Lighting.TimeOfDay == “12:00:00” then
    print (“Correct”)
end

Introduction to C#

A step by step quide to the first C# programs.

The basic structure of a C# program using the Visual Studio IDE is the following:

using System;
using System.Collections.Generic;
using System.Linq;
using System.Text;
using System.Threading.Tasks;

namespace CSharpTutorials {
    class Program{
        static void Main(string[] args){

            // ...your program is here...

        }
    }
}

Output instructions

static void Main (string[] args) {
    Console.WriteLine("Hello World!");
    Console.ReadLine();
}

The line Console.ReadLine(); is needed to keep the terminal alive.

Variables

static void Main (string[] args) {
    string name = "John";
    Console.WriteLine("Hello " + name);
    int age = 19;
    Console.WriteLine ("Your age is " + age)
    Console.ReadLine();
}

Data types in C#

// data types
string phrase = "Hello world";
char letter = 'a';
int number = 42;
double tax = 0.24;

//number to string
string numero = number.ToString();
Console.WriteLine(numero); // output: 42

// string to int or double
string input = Console.ReadLine();
int x = int.Parse(input);
Console.WriteLine(x+1);

string input2 = Console.ReadLine(); 
double d = double.Parse(input2); 
Console.WriteLine(d);

//int to string
int y = 42;
Console.WriteLine(y.ToString());


Conditionals and loops

In Python we can use the if statement as follows:

if a>b:
    print(a)

In contrast to other programming languages Python does not use {} to declare the opening or the closing of an if statement. Python uses indentation (tab key or four spaces). Python’s indentation is a way to tell Python interpreter that a group of statements belong to a block of code. In the previous example the variable a will be printed if a is greater than b.

In the next piece of code the lines 2 and 3 will be executed if a is greater than b and the lines 5 and 6 will be executed if a is not greater than b. Indentation in Python matters!

if (a>b):
    print(a)
    print ("Hello")
else:
    print("b")
    print("Goodbye")

We can always examine more than 2 logical conditions with the use of elif (stands for else if ).

if (a>b):
    print(a)
elif (b>a):
    print(b)
else:
    print("Equals")

Python will create automatically an indent if we end the previous block of code with a colon “:”

A colon is used in conditionals (if statements) as well as in loops (while, for, etc) to declare which lines of code belong to a specific logical expression.

We can also combine logical expressions using the and or the or operator to create more interesting statements. In the following example line 2 will be executed if both of the expressions (age>4 and age <=10) are true.

if age > 4 and age <= 10:
    print('Best age to learn programming')

Loops

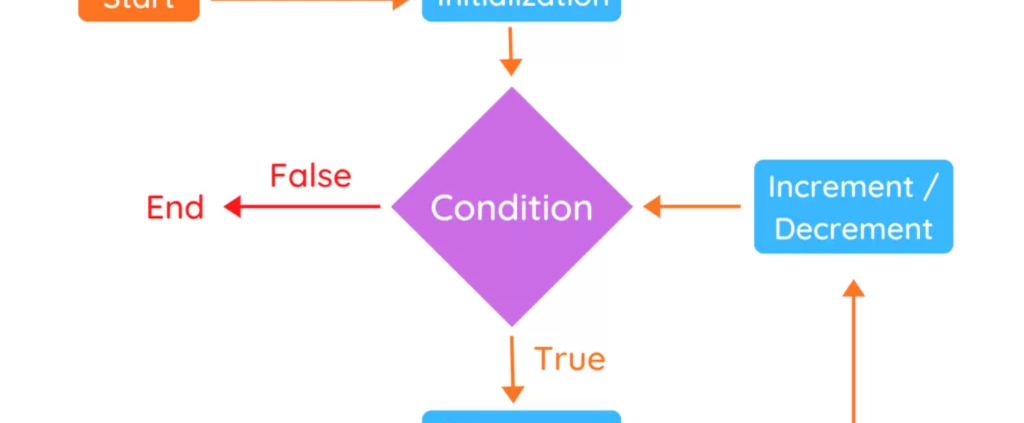
An if statement is useful if we need to check a logical statement once. If we want to keep executing a set of code bocks until a specific logical expression comes true, we have to use a loop.

while

The most common loop statement is the while. In the following example, the while statement will be true as long as the variable a is less than 10.

a=1
while (a<10):
    print(a)
    a = a+1

For loop

for i in range(10):
    name = input('What is your name?')
    if name == 'John':
        print('Hello John')


Conditionals and loops

Detect and Inspect

These three instructions are useful to decide what or if there is a block near the turtle.

The detect command detects if there is an existing block ahead, up or below the turtle. If there is not, the turtle can move. Else, you may use the dig command to destroy the block.

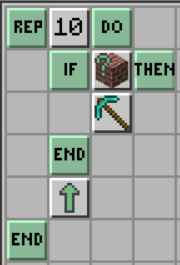
The following program will make the turtle move 10 blocks. If there is an obstacle, the turtle will destroy it.

The rep command stands for repeat.

Repeat is a block which must be written as following:

rep <number> do

<instructions>

end

Inside a repeat loop you can nest other instructions as well.

In the next example the turtle will check 10 times if there is a block ahead; if it is true, it will break the block; in any case it will move 10 blocks forward.

The if statement is a conditional. It is checked once. If it is true it will execute whatever inside the command. An if statement must be written as following:

if <condition> then

<instructions>

end

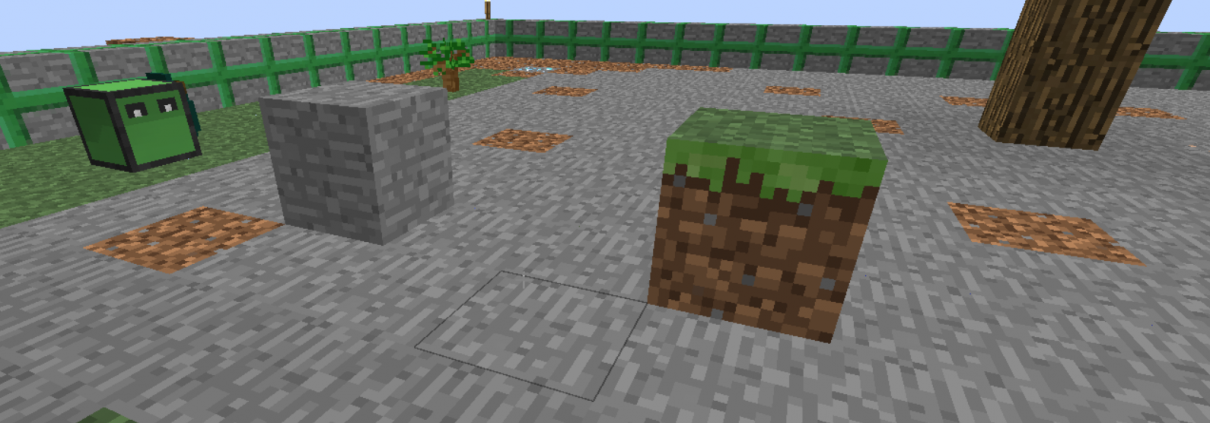
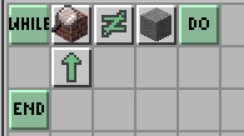
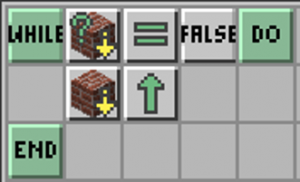
The next program is an example of the inspect block. While the turtle inspects the block ahead and it is not a block of cobblestone, the turtle moves.

The turtle will stop moving when face a cobblestone block.

The while loop is the second iterative control statement.

A while loop must be written as following:

while <condition> do

<instructions>

end

In the while loop the instructions inside are executed as long as the condition is true. The moment the condition turns false there will be an exit from the loop.

In a repeat loop you must state in advance the number of repetitions. In a while loop this number is unknown as the condition may turn false at any point.

Build a bridge with the while loop

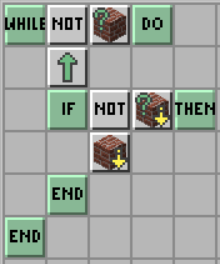
The following code will make the turtle build a bridge, provided that the turtle moves in the air.

In particular, the turtle detects if there is a block below.

If not, the turtle places a block from the first slot of its inventory.

It is required that there are some block items (stone or dirt etc) in the turtle’s inventory.

A fully functional program is the following.

The turtle will keep moving until detects a block.

If below the turtle is nothing, a block will be placed.

This way the turtle will build a bridge while walking in the air.

Of course, if there is nothing ahead the turtle will keep moving forward forever.


Download the lesson in pdf

Program a mining turtle

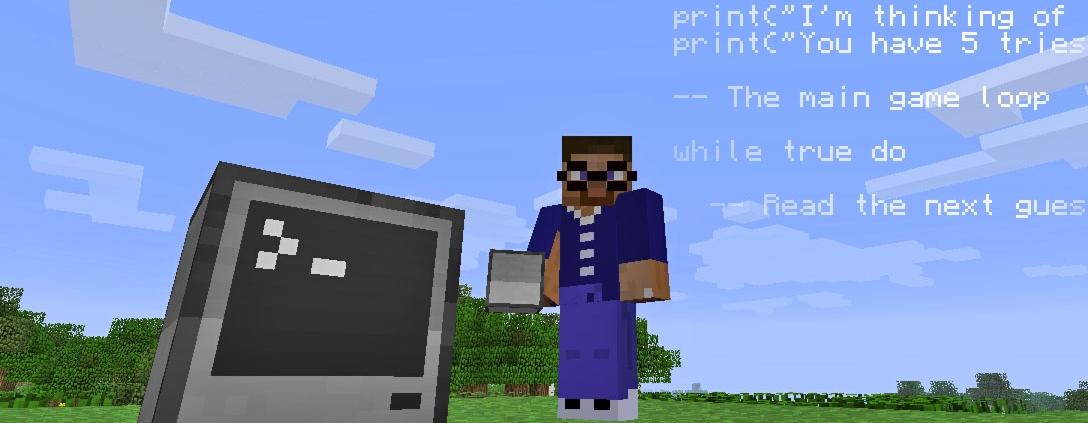
To program a turtle is an awesome way to learn the fundamental concepts of programming while playing your favorite game.

You will need a mining turtle and a remote control.

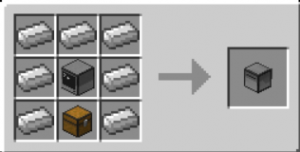
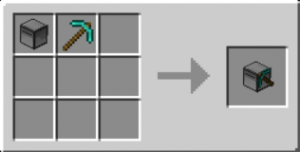
To craft a turtle, you will need 7 iron ingots, 1 computer and 1 chest:

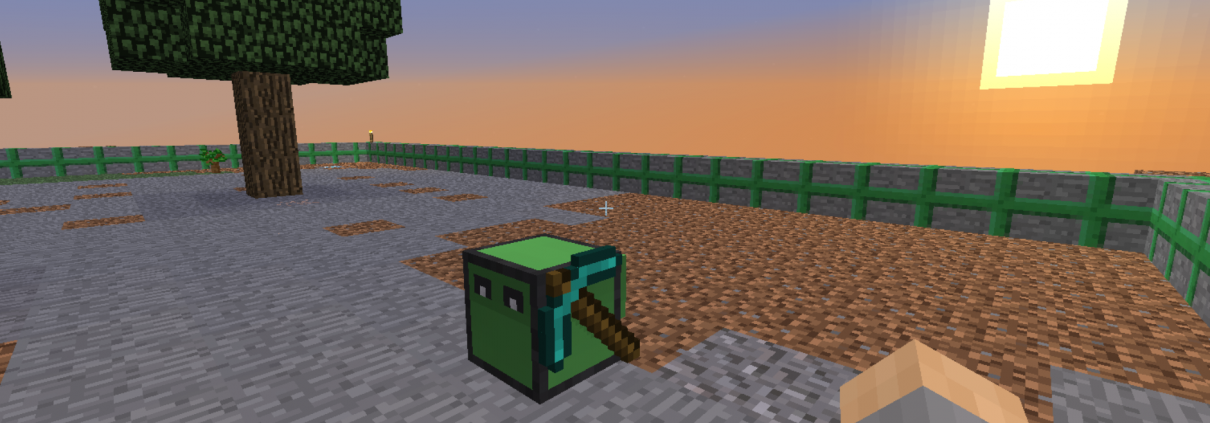
To turn your turtle to a mining turtle you will need a pickaxe:

To control your turtle, you will need a remote control. Right click on the turtle and get ready to code your first program in Minecraft!

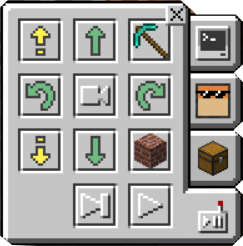
There are a few tabs you can use when you right click on a turtle:

The last one is the remote; you can make basic moves (up, down, forward, back, turn, dig, place).

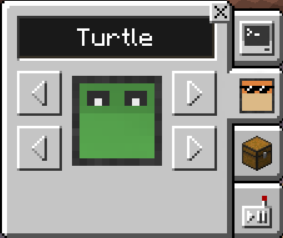
The second tab is used to customize your turtle’s appearance.

The first is the program tab; here you can drag and drop your programming blocks.

There is a huge list in your disposal.

You may use a control statement (if, while, repeat), move or turn commands and a list of actions as well (detect, compare, inspect etc).

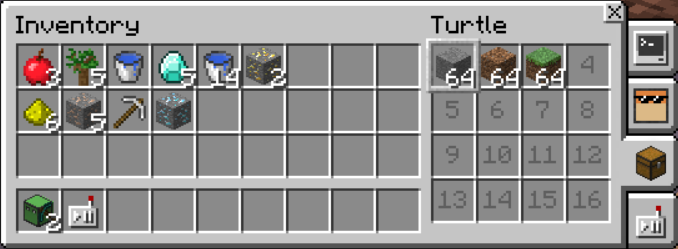
The third one is the turtle’s inventory. You will need items if you want the turtle to place blocks.

You can exchange items between your own and the turtle’s inventory.

You can now program your turtle using appropriate instructions. In the following code the turtle will move forward 10 blocks.

As you can see, you may drag and drop the instructions from the right part of the programming tool and place them in the grid to the left part. If the program has no errors, it will be executed and see the results.

You can switch from visual to code editor to see the actual code running. The language used by MinecraftEdu is Lua.


Download the lesson in pdf

ComputerCraft

What ComputerCraft is about?

It is a mod you can download and install

  • Mods (short for modifications) are anything that changes Minecraft’s game content from what it originally was.

ComputerCraft adds computers that you can program in Lua

  • Lua is a powerful, efficient, lightweight, embeddable scripting language.
  • “Lua” (pronounced LOO-ah) means “Moon” in Portuguese. As such, it is neither an acronym nor an abbreviation, but a noun.

ComputerCraft also adds Turtles – little robots

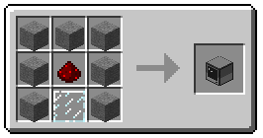
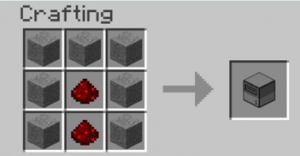
How to craft a computer?

Recipe for a computer:

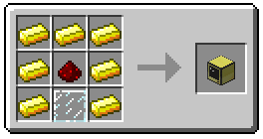
Advanced computer (mouse support & colors):

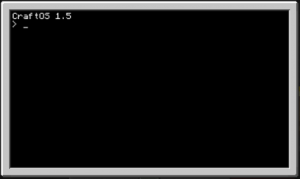
This is what your computer should look like

This is called the terminal or command line interface.

We can type into this and the computer will receive the keystrokes.

Commands to practice

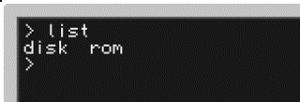
list

The list program shows the files and folders in the current directory

list <name>

We can see the contents of the <name> folder

cd <name>

Change our current directory to the <name> folder

cd ..

Changes the directory to be one level higher than the current directory

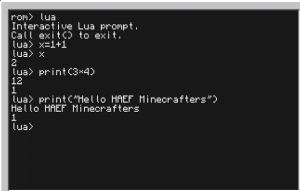
lua

The “lua” program starts another command-line interface where we can run lua code directly

Let’s run little bits of actual lua code

Type in ‘x = 1 + 1’ and hit Enter

Type ‘x’

Type ‘print(“hello world”)’

exit() function to exit the lua prompt

… and that’s it!

Create/edit a file

edit startup

Tells the edit program to edit the file named “startup” in the current directory. Since that file doesn’t exist, it will open up a blank editor.

When we save the file in the editor, it will automatically create the file since it did not exist already.

The edit program is one of the programs in ComputerCraft that requires an argument when you start it.

edit myFile

Type ‘print(“Hello minecrafters”)

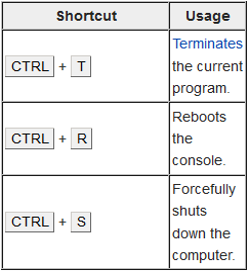
Ctrl > Save > Exit

Type ‘myFile

How to print, do math, run a program

How to print stuff to a computer

print()

print(“Hello”)

How to do math with a computer

print(5+5)

How to run a program

Just type the name of the file/program

Declare Variables

local variables

local a=10

print(a^2)

Get input from user

print(“type your name”)

Declare the variable name to store the answer of the user

local name=read()

print(name)

print(“name”)

The “if” statement

The general form of the if statement is the following:

if <condition> then

<commands>

else

<commands>

end

Create a program to ask your name, read it and if it is valid print “Hello”, if not, print “Who are you?”

if (name==“Christos”) then

print (“Hello”)

else

print (“Who are you?”)

end

Craft a disk drive and a disk

Recipe for disk drive (device needed to read floppy disks):

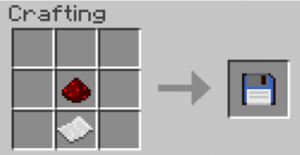
Floppy disk (a storage media to copy files):

Use a floppy disk

Place the disk drive directly adjacent to the computer

Right click the disk drive to open its inventory interface and place the floppy disk into the drive

If you attach successfully a disk drive to a computer, by typing “list” you see that there is a folder named “disk”.

You can now create, edit, move or copy files into the disk and exchange files with other players or computers.

Assign a label to a disk

You can assign the disk a label

Use the same label command you used to set the computer’s label

You have to include the name of the side that the disk drive is on, in order to set the disk’s label rather than the computer’s.

If your disk drive is on the right side of the computer, you should use the command `label set right test-disk` to set the disk’s label to “test-disk“

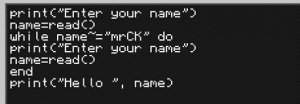
Exercise 1: Create a program in a disk

This program should:

  • Ask for your name
  • While the name you type is not the correct one, ask again
  • The loop should end when you type the correct name (your name)

Solution

Reviewing the if statement

The if statement is a Control Structure

Control structures effect the flow of the program

The if statement is executed once

if <condition> then

<commands>

else

<commands>

end

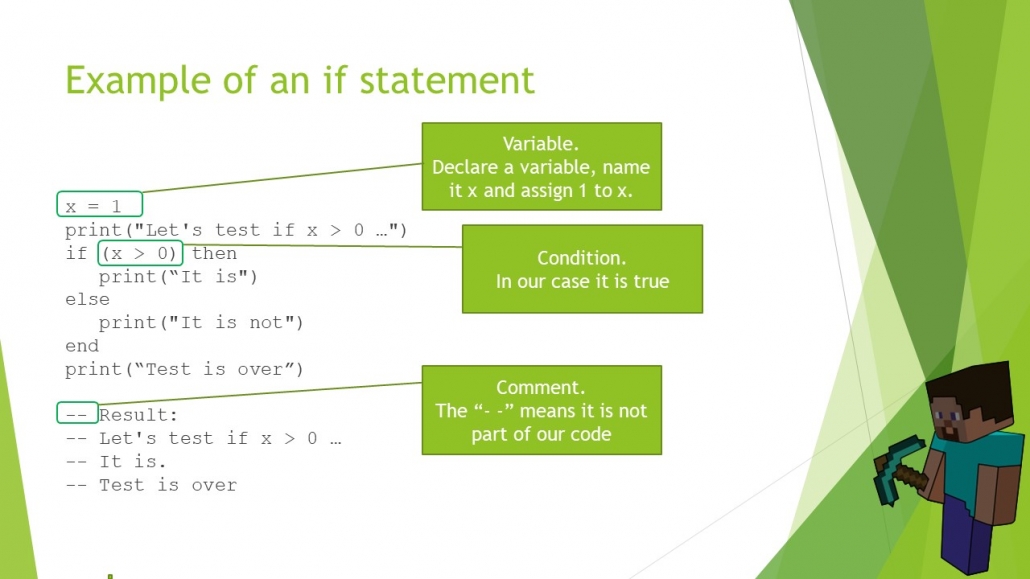
Example of an if statement

x = 1
print(“Let’s test if x > 0 …”)
if (x > 0) then
print(“It is”)
else
print(“It is not”)
end
print(“Test is over”)

— Result:
— Let’s test if x > 0 …
— It is.
— Test is over

Let’s explain the above code:

The while loop

The while statement is a control function

It keeps running until the condition is false

A condition could be either true or false

while <condition> do

<commands>

end

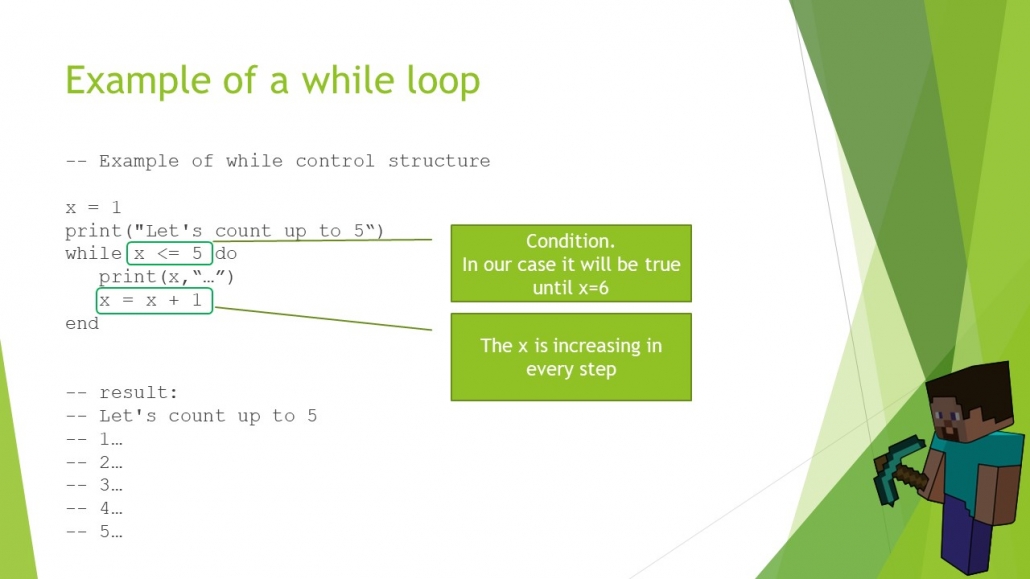
Example of a while loop

–Example of while control structure
x = 1
print(“Let’s count up to 5“)
while x <= 5 do
print(x,“…”)
x = x + 1
end
— result:
— Let’s count up to 5
— 1…
— 2…
— 3…
— 4…
— 5…

Exercise 2: Create a password protected door

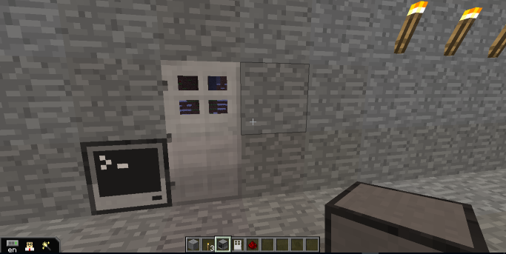
Create an iron door

Place a computer next to it or connect the computer to the door using redstone

Create a program in the computer and name it startup (to run every time the computer reboots)

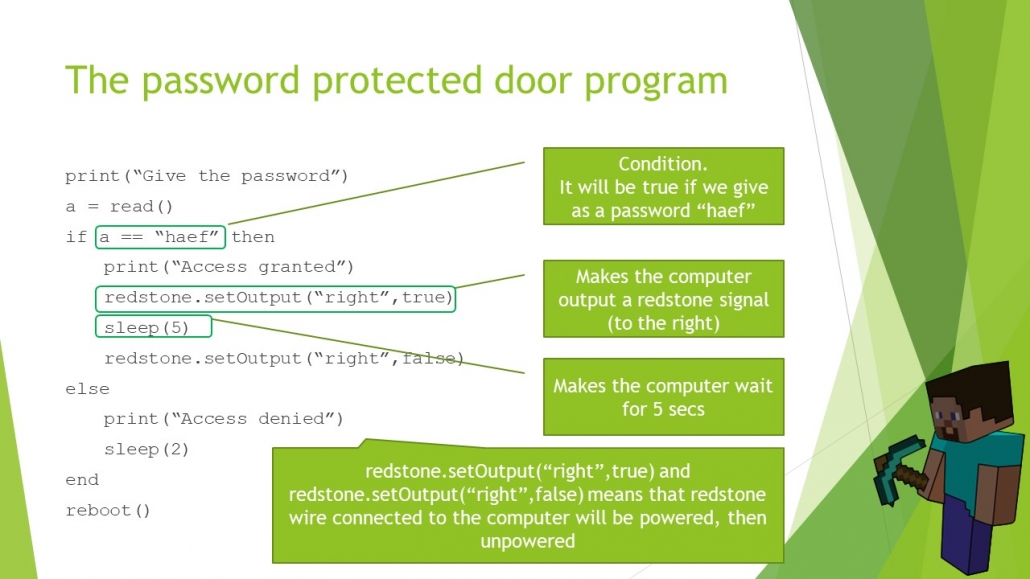
The program must ask for the password (“haef”) and grant access or not

Solution

print(“Give the password”)
a = read()
if a == “minecraft” then
print(“Access granted”)
redstone.setOutput(“right”,true)
sleep(5)
redstone.setOutput(“right”,false)
else
print(“Access denied”)
sleep(2)
end
reboot()

Strings

A string is a set of characters. Letters, numbers or symbols inside quotes form a string. We may use single or double quotes around
a string:

“Hello world.”
‘Hello world.’

Both of the above values are strings.


String is a sequence

A string is a sequence of characters. We can access the characters using their index. The index indicates the increasing number of the character in the sequence. In programming we usually start by 0, not 1.

name = 'Jack' 
letter = name[0]

Now in letter there is the first character of name (‘J’).

J is the 0-th letter of name, ‘a’ is the 1-th and so on.

An index must be an integer value.


Change case methods

Python has a lot of methods to use with strings. A method is an action that Python can perform. There is always a dot (.) after the varable’s name to tell Python that the specific method applies on the particular variable. A method usually needs a set of parentheses, because methods accept additional data (parameters). These parameters are provided inside the parentheses. In case the method needs no parameters, the parenthses are empty.

See the following code.

message = "name surname"
print(message.title())
print(message.upper())
print(message.lower())

The .title() method outputs “Name Surname”.

The .upper() method outputs “NAME SURNAME”.

The .lower() method outputs “name surname”.


The len() function

We can get the number of characters in a string using the len() function.

name = 'Jack'
x=len(name)
print(x)

The code above will output 4. The string ‘Jack’ has 4 characters.

If you need to get the last character, you must ask for the name[len(name)-1]. As we have already mentioned the first character is the 0-th, so the last is len(name)-1.

name = 'Jack'
print(name[0], name[1], name[2], name[len(name)-1])

The code above will output the letters ‘J’, ‘a’, ‘c’ and ‘k’.

Alternatively, you can use negative indices, which count backward from the end of the string. The expression fruit[-1] yields the last letter, fruit[-2] yields the second to last, and so on.


Traverse a String

A lot of computations involve processing a string one character at a time. Often they start at the beginning, select each character in turn, do something to it, and continue until the end. This pattern of processing is called a traversal. One way to write a traversal is with a while loop:

index = 0 
while index < len(fruit): 
    letter = fruit[index] 
    print letter 
    index = index + 1

This loop traverses the string and displays each letter on a line by itself. The loop condition is index < len(fruit), so when index is equal to the length of the string, the condition is false, and the body of the loop is not executed. The last character accessed is the one with the index len(fruit)-1, which is the last character in the string.

Exercise 1

Write a function that takes a string as an argument and displays the letters backward, one per line.

Another way to write a traversal is with a for loop:

for char in fruit: 
    print char

Each time through the loop, the next character in the string is assigned to the variable char. The loop continues until no characters are left.

Τhe following example shows how to use concatenation (string addition) and a for loop to generate an series of similar words. This loop outputs the names Jack, Mack and Zack in order:

prefixes = 'JMZ' 
suffix = 'ack' 
for letter in prefixes: 
    print letter + suffix

The output is:

Jack
Mack
Zack


How to slice a String

A segment of a string is called a slice. Selecting a slice is similar to selecting a character:

s = 'Monty Python' 
print s[0:5]

The output is Monty

The operator [n:m] returns the part of the string from the “n-eth” character to the “m-eth” character, including the first but excluding the last.

If you omit the first index (before the colon), the slice starts at the beginning of the string. If you omit the second index, the slice goes to the end of the string:

fruit = 'banana'
fruit[:3]

The output is ‘ban’

fruit[3:]

The output is ‘ana’

If the first index is greater than or equal to the second the result is an empty string, represented by two quotation marks:

fruit = 'banana'
fruit[3:3]

The output is ”

An empty string contains no characters and has length 0, but other than that, it is the same as any other string.

Exercise 3

Given that fruit is a string, what does fruit[:] mean?


Strings are immutable

It is tempting to use the [] operator on the left side of an assignment, with the intention of changing a character in a string. For example:

>>> greeting = 'Hello, world!'
>>> greeting[0] = 'J'
TypeError: 'str' object does not support item assignment

The “object” in this case is the string and the “item” is the character you tried to assign. For now, an object is the same thing as a value, but we will refine that definition later. An item is one of the values in a sequence.

The reason for the error is that strings are immutable, which means you can’t change an existing string. The best you can do is create a new string that is a variation on the original:

>>> greeting = 'Hello, world!'
>>> new_greeting = 'J' + greeting[1:]
>>> print new_greeting
Jello, world!

This example concatenates a new first letter onto a slice of greeting. It has no effect on the original string.


Searching

What does the following piece of code do?

def find(word, letter):
    index = 0
    while index < len(word):
        if word[index] == letter:
            return index
        index = index + 1
    return -1

The function takes a word and a character and finds the index where that character appears in the word. If the character is not found, the function returns -1.

This is the first example we have seen of a return statement inside a loop. If word[index] == letter, the function breaks out of the loop and returns immediately.

If the character doesn’t appear in the string, the program exits the loop normally and returns -1.

This pattern of computation—traversing a sequence and returning when we find what we are looking for—is called a search.

Exercise 4

Modify find so that it has a third parameter, the index in word where it should start looking.


Looping and counting

The following program counts the number of times the letter a appears in a string:

word = ‘banana’
count = 0
for letter in word:
if letter == ‘a’:
count = count + 1
print count

This program demonstrates another pattern of computation called a counter. The variable count is initialized to 0 and then incremented each time an a is found. When the loop exits, count contains the result—the total number of a’s.

Exercise 5  Encapsulate this code in a function named count, and generalize it so that it accepts the string and the letter as arguments.

Exercise 6Rewrite this function so that instead of traversing the string, it uses the three-parameter version of find from the previous section.

String methods

A method is similar to a function—it takes arguments and returns a value—but the syntax is different. For example, the method upper takes a string and returns a new string with all uppercase letters:

Instead of the function syntax upper(word), it uses the method syntax word.upper().

>>> word = ‘banana’
>>> new_word = word.upper()
>>> print new_word
BANANA

This form of dot notation specifies the name of the method, upper, and the name of the string to apply the method to, word. The empty parentheses indicate that this method takes no argument.

A method call is called an invocation; in this case, we would say that we are invoking upper on the word.

As it turns out, there is a string method named find that is remarkably similar to the function we wrote:

>>> word = ‘banana’
>>> index = word.find(‘a’)
>>> print index
1

In this example, we invoke find on word and pass the letter we are looking for as a parameter.

Actually, the find method is more general than our function; it can find substrings, not just characters:

>>> word.find(‘na’)
2

It can take as a second argument the index where it should start:

>>> word.find(‘na’, 3)
4

And as a third argument the index where it should stop:

>>> name = ‘bob’
>>> name.find(‘b’, 1, 2)
-1

This search fails because b does not appear in the index range from 1 to 2 (not including 2).

Exercise 7  There is a string method called count that is similar to the function in the previous exercise. Read the documentation of this method and write an invocation that counts the number of as in ‘banana’.

Exercise 8  Read the documentation of the string methods at http://docs.python.org/2/library/stdtypes.html#string-methods. You might want to experiment with some of them to make sure you understand how they work. strip and replace are particularly useful.

The documentation uses a syntax that might be confusing. For example, in find(sub[, start[, end]]), the brackets indicate optional arguments. So sub is required, but start is optional, and if you include start, then end is optional.

The in operator

The word in is a boolean operator that takes two strings and returns True if the first appears as a substring in the second:

>>> ‘a’ in ‘banana’
True
>>> ‘seed’ in ‘banana’
False

For example, the following function prints all the letters from word1 that also appear in word2:

def in_both(word1, word2):
for letter in word1:
if letter in word2:
print letter

With well-chosen variable names, Python sometimes reads like English. You could read this loop, “for (each) letter in (the first) word, if (the) letter (appears) in (the second) word, print (the) letter.”

Here’s what you get if you compare apples and oranges:

>>> in_both(‘apples’, ‘oranges’)
a
e
s

String comparison

The relational operators work on strings. To see if two strings are equal:

if word == ‘banana’:
print ‘All right, bananas.’

Other relational operations are useful for putting words in alphabetical order:

if word < ‘banana’:
print ‘Your word,’ + word + ‘, comes before banana.’
elif word > ‘banana’:
print ‘Your word,’ + word + ‘, comes after banana.’
else:
print ‘All right, bananas.’

Python does not handle uppercase and lowercase letters the same way that people do. All the uppercase letters come before all the lowercase letters, so:

Your word, Pineapple, comes before banana.

A common way to address this problem is to convert strings to a standard format, such as all lowercase, before performing the comparison. Keep that in mind in case you have to defend yourself against a man armed with a Pineapple.

Introduction to Python

Download Thonny IDE from:

https://thonny.org/

Thonny is an Integrated Development Environment for beginners. Yet it is powerful enough to build robust applications.

Input a value

Open Thonny and write your first program:

name = input ("what is your name?")
print ("Hello", name)

You may use double or single quotation marks (‘ or ”) to print a message to the screen. The input() command will accept the input from the user and store it to a variable. Inside the parenthesis we can prompt a message to the user.

In the previous example we used a variable named ‘name’.

The variable is a position in computer’s memory where we can hold (and change) a value. For more on variables you can see the Variables post.

In Python, variable names can contain only letters, numbers, and underscores. A variable can start with a letter or an underscore, but not with a number.

In our example, the value in variable name is a string, i.e. a set of characters.

We may use int(input()) to input an integer (int):

name = input ("what is your name?")
age = int(input("What is your age?"))  
print ("Hello", name, "you are", age, "years old.")

We can prompt the same messages for the inputs with a “\n”. In Python we use backslash (\) to represent certain whitespace characters (n for new line or t for tab).

In Python 3 we can use the “f” character to declare a formatted output for the print() command. In the following statement we use a formatted output with the variables inside brackets { }.

print (f"Hello {name}, you are {age} years old.")

We can also perform some calculations. The following line will produce 3.0 (float number) as a result.

print ((10-2)*3/8)

Introduction to programming with Scratch

Scratch is a visual programming environment (drag and drop blocks like lego snapped together to create a script). The key idea of Scratch is to focus on projects instead of puzzles (like code.org). Children become familiarized with the process of transforming an idea to a program. Kids learn how to deal with challenges, how to solve problems, how to develop abstract problem solving skills.

Lesson 1: Move around

Learning objectives

Problem solving and math skills in game context.

Create an animation and enhance visuospatial abilities.

Simple logical test.

Know the difference between if statements and loops.

Introduction

Ask the children to choose a sprite from the library.

They may delete, rename, enlarge or shrink the sprite.